Raspberry Pi drone – Part 1 – Overview
This article is in fact a second one in a Rapberry Pi drone series. Previous article can be read here.
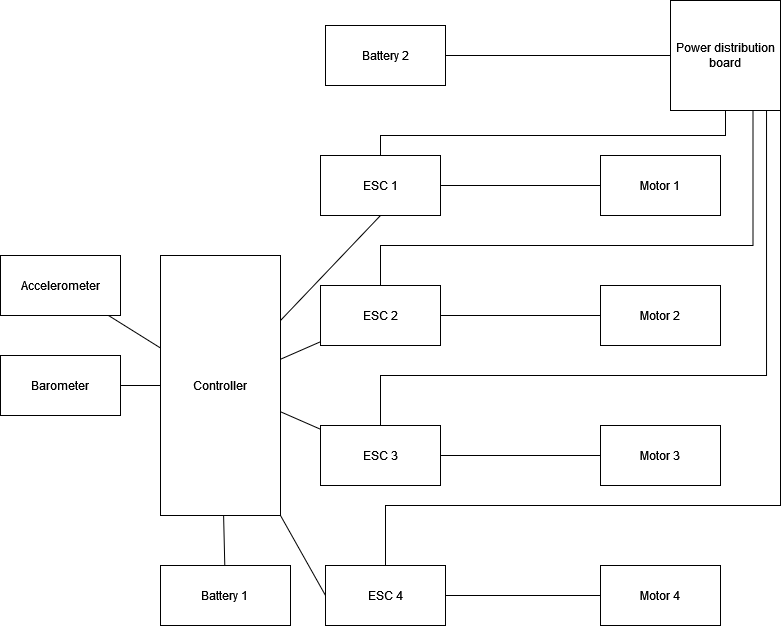
In Part 1 I will cover basic overview of drone architecture and elaborate on components used. As the image below displays, this project will need:
- main controller,
- 2 batteries,
- 4 brush-less motors,
- 4 ESC controllers,
- power distribution board,
- accelerometer and
- barometer.
Main controller
The role of main controller will be taken by Raspberry Zero 2W. Why? I had one lying about collecting dust. Could I just as well used an Arduino? Yes.
Main controller will have to implement event loop, telemetry logging and navigation logic. It will also be responsible to talk to all components used. I am going to make it support software-in-the-loop simulations, which should make debugging of navigation logic more discrete.
Accelerometer and barometer are I2C components and are going to be daisy chained on same pins. ESCs will be connected to 4 separate PWM (pulse width modulation) gpio pins of Raspberry pi. All code will be written in C.
Controller will be powered by its own battery. This is going to be a RealPower PB-Lipstick powerbank with 2500mAh and 5V/1A output, which should suffice for about 1 hour of operation.
Accelerometer
For this implementation, I will be using Adafruit Triple-axis accelerometer MMA8451. It will be used to define yaw, roll and pitch to determine how the vehicle is poistioned in 3-d space. Also, the component can measure acceleration up to 8G, which is plenty.
Barometer
Another Adafruit component MPL115A2 will be a barometric pressure and temperature sensor. It is not the best of the bunch, with precision of 1.3kPa, but it should suffice for this implementation. The fact that is outputting temperature as well is only an added on bonus.
Electronic speed controller (ESC)
To drive powerful motors as the drone needs, a component called electronic speed controller is a must. ESC can be controlled using pulse width modulation, meaning that length of pulse defines output power of ESC, hence running motor at higher or lower speeds.
Another reason to use Raspberry Pi as main controller, as it supports 4 PWM devices via gpio.
For power, ESCs will use LiPo battery 2S / 3S.
Brush-less motor
To fly a drone, one needs at least 4 powerful motors. Classic brush motors are just not cutting it, due to low power output. Hence, brush-less motors will be used. However, power, has its down side. Each motor will use maximum of about 45W of electricity (7.4V and 6A of current).
To calculate how much power your motor needs for lift-off, I suggest you read this excellent article about this topic. For my application, 45W of power per motor should be plenty.
Power distribution board
As each motor needs its own ESC and there will only be one battery to power it all, a power distribution board is going to be used. I could have done it myself. I opted to buy one instead, to save on time and space.
Battery 2
This is the main battery for main motors. It is a LiPo battery 2S / 3S. I am leaning towards 3S due to capacity. However, higher capacity means more weight. A battery will need to be able to output 7.4V with 24A of current consistently.
In next part, Part 2, we will cover basics of how to drive I2C devices with RaspberryPi.
Leave a Reply