Setting up cMake with minGW on Windows

I develop mostly in safety of Visual Studio or Visual Studio Code. And in .NET. Only recently, I rediscovered passion for C++. The speed, the elegance, numerous hours thrown into the thin air trying to find a solution to a simple problem, that somehow is just notoriously difficult in C++… You get the gist of it.

Visual Studio is a wonderful IDE. Mind you, due to it’s heavy weight and feature-rich nature, my development process was always limited to my desktop PC. And the same lately goes for Visual Studio Code. Even though, majority of my work and side-projects is done on desktop PCs, I do want to sometimes work on stuff, while I am nowhere near my home and my PC. For those situations I own an entry level Surface Go 2 with some really really shoddy hardware. It kind of holds it’s own for browsing and remoting to a work PC, if there is an emergency, but installing Visual Studio or Visual Studio Code on it is out of the question as there is not nearly enough diskspace, CPU power or memory for that.

I did think to crate a VM on my home lab server to run Windows and mentioned IDE, but I really don’t want to waste so much resources just to use it occasionally. Plus, I don’t like to expose my home network to outside incoming traffic.

But, I don’t need a full fledged IDE to develop stuff. I mean, it is a nice feature to have, but realistically, all you need is something with basic highlighting and formatting and a decent compiler. I cannot imagine this tablet to compile anything dotnet related in reasonable amount of time, however, it should be totally fine compiling C++ code. I mean, if C++ and C code compile reasonably fast on my Pi Zero 2W…

Hence, I went with Notepad++ as my editor, MinGW as compiler and cMake as build tool. And I lost a day just trying to build a Hello World project. I never used MinGW or cMake, but I heard good things about them from nice folk of the internets.

MinGW

Installing MinGW is a piece of cake. I just typed MinGW in my favorite search engine, clicked first link and downloaded it from SourceForge. It was only after several hours of trying to make cMake cooperate with MinGW, that I noticed, my version of MinGW is totally wrong. You see, MinGW is stuck at version 6.x and is not maintained anymore. In order to get latest and greatest features, what you really need is MinGW-64. So I removed old MinGW and went to the page, looking for install package. Except, binaries on Github are not latest and greatest and, according to VirusTotal page, contain a trojan. Hence, I went the way, VS Code page recommends. Installing MySYS2 first and then use pacman to install MinGW-64.

cMake

For those who do not know what cMake is, it is basically a tool that helps you generate make files and build your project using your desired compiler. It supports wide variety of compilers including VC++ and MinGW.

Installing cMake was way easier. I downloaded and installed a package from projects official site. Simple enough. The problem with cMake though, is that it has some steep learning curve and subpar documentation. Specially, if you are a beginner, you will lose numerous hours, for simple tasks that could be explained in one code snippet.

How cMake works in a nutshell is, you need a CMakeLists.txt file in your source directory. That file tells cMake, what should compile, using what compiler and linker and which libraries should include and whatnot. Of course, to make it a tad more interesting, you must use cMake scripting syntax. Have I mentioned, their documentation is really subpar?

Putting it all together

For demo purposes, I created a simple Hello World program in C++. I named the file main.cpp, as that is how you named main CPP file when I started to learn the language. You can name it foo.cpp, if you like.

#include <stdio.h>

int main()
{
    fprintf(stdout, "Hello World!\n");
    return 0;
}

Next to that file I created a file named CMakeLists.txt with following contents. The name cannot be foo.txt in this case, as far as I know.

# Minimum cMake version for build process
cmake_minimum_required(VERSION 3.28)

# I set PROJECT_NAME variable to example1
set(PROJECT_NAME example1)

# Set C++ standard 
set(CMAKE_CXX_STANDARD 17)
set(CMAKE_CXX_STANDARD_REQUIRED ON)

# Define project and tell cMake it is a C/C++ project
project(${PROJECT_NAME} CXX)

# Set different output directory
set(CMAKE_RUNTIME_OUTPUT_DIRECTORY "../bin")

# Get all source files recursively and store it into SOURCES variable
file(GLOB_RECURSE SOURCES RELATIVE ${CMAKE_SOURCE_DIR} "*.cpp")

# Add the executable with all found sources in SOURCES
add_executable(${PROJECT_NAME} ${SOURCES})

As far as I know, that is the most minimalistic cMake script you need to compile a simple program.

To create a Makefile, I created a new directory named “build”, because I am weird that way and believe that build scripts have nothing to do with my source code. In command line, I went to that “build” directory and ran:

cmake .. -G "MinGW Makefiles"

Command tells cMake to take parent directory (“..”), search for CMakeLists.txt file and use “MinGW Makefiles” generator to generate Makefile. And it did just that. And some other files it needs to compile the project.

To compile my very interesting project, I needed to then run:

cmake --build .

And voila! About 30s later (my tablet is not THAT great) binary named “bin\example1.exe” has been built and outputs “Hello World!” as expected.
Raspberry Pi drone – Part 1 – Overview

This article is in fact a second one in a Rapberry Pi drone series. Previous article can be read here.

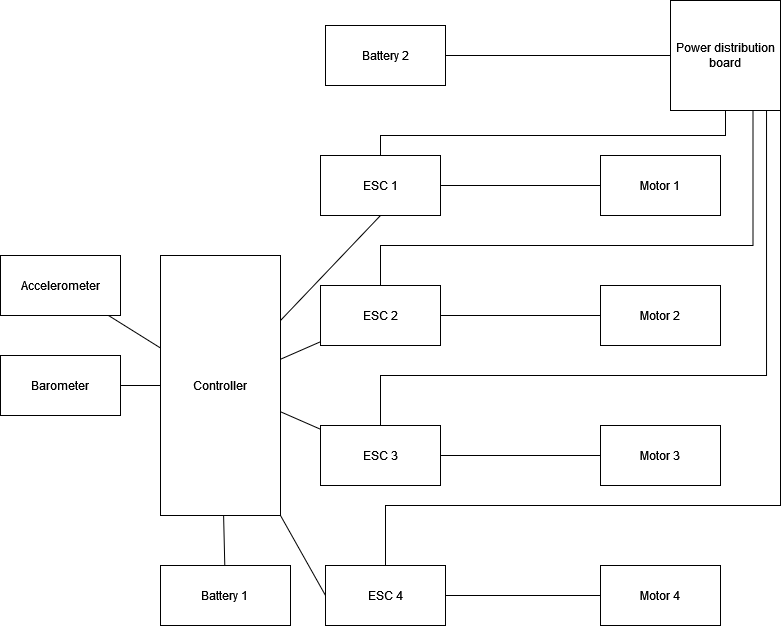
In Part 1 I will cover basic overview of drone architecture and elaborate on components used. As the image below displays, this project will need:

  • main controller,
  • 2 batteries,
  • 4 brush-less motors,
  • 4 ESC controllers,
  • power distribution board,
  • accelerometer and
  • barometer.

Main controller

The role of main controller will be taken by Raspberry Zero 2W. Why? I had one lying about collecting dust. Could I just as well used an Arduino? Yes.

Main controller will have to implement event loop, telemetry logging and navigation logic. It will also be responsible to talk to all components used. I am going to make it support software-in-the-loop simulations, which should make debugging of navigation logic more discrete.

Accelerometer and barometer are I2C components and are going to be daisy chained on same pins. ESCs will be connected to 4 separate PWM (pulse width modulation) gpio pins of Raspberry pi. All code will be written in C.

Controller will be powered by its own battery. This is going to be a RealPower PB-Lipstick powerbank with 2500mAh and 5V/1A output, which should suffice for about 1 hour of operation.

Accelerometer

For this implementation, I will be using Adafruit Triple-axis accelerometer MMA8451. It will be used to define yaw, roll and pitch to determine how the vehicle is poistioned in 3-d space. Also, the component can measure acceleration up to 8G, which is plenty.

Barometer

Another Adafruit component MPL115A2 will be a barometric pressure and temperature sensor. It is not the best of the bunch, with precision of 1.3kPa, but it should suffice for this implementation. The fact that is outputting temperature as well is only an added on bonus.

Electronic speed controller (ESC)

To drive powerful motors as the drone needs, a component called electronic speed controller is a must. ESC can be controlled using pulse width modulation, meaning that length of pulse defines output power of ESC, hence running motor at higher or lower speeds.

Another reason to use Raspberry Pi as main controller, as it supports 4 PWM devices via gpio.

For power, ESCs will use LiPo battery 2S / 3S.

Brush-less motor

To fly a drone, one needs at least 4 powerful motors. Classic brush motors are just not cutting it, due to low power output. Hence, brush-less motors will be used. However, power, has its down side. Each motor will use maximum of about 45W of electricity (7.4V and 6A of current).

To calculate how much power your motor needs for lift-off, I suggest you read this excellent article about this topic. For my application, 45W of power per motor should be plenty.

Power distribution board

As each motor needs its own ESC and there will only be one battery to power it all, a power distribution board is going to be used. I could have done it myself. I opted to buy one instead, to save on time and space.

Battery 2

This is the main battery for main motors. It is a LiPo battery 2S / 3S. I am leaning towards 3S due to capacity. However, higher capacity means more weight. A battery will need to be able to output 7.4V with 24A of current consistently.

In next part, Part 2, we will cover basics of how to drive I2C devices with RaspberryPi.

Raspberry Pi drone – Prelude

Lately, I just could not find motivation to work on my side-project, hence I spent my time procrastinating on a well known video sharing social website. Purely for motivation purposes that is. Yeah. That is it. Purely for motivation purposes.

During my procrastination… ummm… motivation period, I have encountered a vlog of a guy doing model rockets with active navigation system. You might have heard of his company. It is called BPS space.

Watching his videos made me think back of the days, when soldering and electronic circuits design was something I did regularly. The more I thought about it, the more I was convinced that an electronic project was something I needed to get my juices flowing again. Model rocketry is out of the question for many reasons, but I thought of another project that might be interesting. Building my own drone.

But why would I want to build my own drone? Well, one, it looks like a fun project and two, I always wanted one. Sure, I could buy one, but where is the fun in that? Plus, kids have grown to a point, where such a project might interest them as well.

I am starting small. I want first incarnation (conveniently named Lev One) of my drone (a quad-copter) to levitate in a closed space (like, you know, a room) at relative altitude of 1 meter. In the future, I will add other things, like ability to maneuver it manually, a camera and of course a “follow me” feature. But for now, getting it off the ground straight to a height of 1 meter sounds plenty. Better yet. It sounds like a manageable step. On paper.

To get a drone to levitate at 1 meter height, the drone needs to understand how high it is and what is its position in 3D space. It needs to have the ability to maintain it’s position even though a closed space likely has little if any wind effect. It also needs to have a powerful battery to drive it’s four engines and run a controller for navigation.

In order to achieve this milestone I will need:

  1. a controller to handle navigation
  2. some sort of barometer that will help determine altitude
  3. a gyroscope to determine pitch, roll, yaw and acceleration of a drone
  4. four brush-less motors to run propellers
  5. four ESC controllers to control speed of motor
  6. a voltage divider to deliver expected voltage and current to all hardware
  7. a battery to power it all
  8. some sort of housing and
  9. a lot of luck and patience.

I have already decided on a controller, which, as one might have assumed from the title, will be a Raspberry Pi. More accurately a Raspberry Pi Zero 2W I had lying about for some time now, gathering dust. I have a vague idea about the feature set it will need to sport. Details will be covered in one of future articles.

These articles will be published sporadically and will cover topics as I progress on my path to my milestone – Lev One and onwards. Part 1 will cover my overview of the project and will describe all components used in this project as well as decisions behind choosing these components.

Bug tracking – yes or no

Yesterday, I encountered an article on Medium titled A Better Bug Tracker by Anthony Sciamanna. The author goes to great lengths describing why bug trackers are unnecessary and point to the problem in your development workflow. Further, Mr. Sciamanna quotes Uncle Bob Martin (self proclaimed Software Craftsman):


“Think about what it means to use a bug tracking system. You have so many bugs you need an automated system to keep track of them.”


Now, far being from me, to disagree with such software developer authorities. And I do partially agree with points made in the article. You should have zero-bugs policy. Yes, you should modify your process to reduce the number of it. Yes, you should write unit tests. Yes, yes and yes. However, both gentlemen either do not know the purpose of bug trackers or they just pretend they do not in order to promote their ways. Personally, I am not sure which is worse.

First of all. Unit tests are not a solve-it-all tool. Yes, they present de-facto specifications for your code. Yes, they do make you think about possible edge-cases. Still, the test is only as good as the developer that made it. Now, I expect some will start waving at me with code coverage reports. I am sorry to tell you. I have seen a code coverage of 100% and unit tests that weren’t worth the electricity used to produce them.

Next, bug/issue trackers were made for people to log bugs, features, tasks etc that they cannot attend to at this very moment and I am pretty sure that there isn’t a single bug tracker out there that was made with an intention of encouraging developers to produce bugs.

Every developer I know, keeps some sort of log for features that need to be implemented, bugs that need to be fixed and tasks that must be performed (either in Notepad++, Excel or JIRA) and I am pretty sure the author of said article as well. The question is why do we, developers, log bugs? The answer is simple. So they don’t get lost or forgotten. Yes, I get fix bugs-first policy, but let’s say you are just fixing a bug and now a new bug report gets in. Should I stop fixing the bug I am currently working on? No. I will log the new one and continue working on my existing work.

I am glad to hear that Mr. Sciamanna and Uncle Bob Martin can hold everything they have in a queue in their head while doing continuous context-switching (or maybe, they are just not that busy). I am, sadly, not of that sort. If you tell me two things at once while I am doing something completely different, you will be lucky, if I fully remember one. Hence, I tend to write things down. And here is where bug tracker comes in handy. I use it to log ideas for new features, bugs, tasks that await me during the day, the full Monty. Sure, you can use excel spreadsheet for that, but doesn’t that spreadsheet then becomes a simple bug tracker?

Not using a bug tracker does not imply that your software doesn’t have bugs. Much like sticking your head in the sand doesn’t make your rear end invisible to innocent observers on land. It makes you look stupid, though.

What I learned last week… uh… months

It has been a long time, since I have written a post. Reasons vary. Most of it is down to my laziness and limitations to my spare time. Some of it is down to lack of motivation as well.

Anyway, during several last months I have, surprisingly, learned many new things. I limited my pick to the following items:

  1. You cannot set Prefer 32-bit option to class library in .NET
  2. ORACLE RDBMS column names must not exceed 30 characters
  3. People, suggesting that copy & paste for VPN connections must be disabled, should be “taken care of”
  4. No matter what the task is, you must take your time to solve it
  5. CSRF feature, known as warning SG0016 is annoying, if you are implementing public API
  6. How to use query string parameters in non-RESTful API
  7. FastDirectoryEnumerator!
  8. When using integration to move some data, always use separate table

Now to details.


You cannot set Prefer 32-bit option class library in .NET

The setting can be located in Project properties -> Build, but it is disabled for class libraries. First of all, as per this StackOverflow article, the only difference between selecting “x86”  as platform target and using “Prefer 32-bit” option is that application compiled for “x86” will fail on ARM based environment, while application compiled for “Any CPU” with “Prefer 32-bit” selected will not. My reasoning is that as executable projects are meant to define the architecture for entire application, this setting would have no meaning in class libraries. Hence, it is disabled.


ORACLE RDBMS column names must not exceed 30 characters

Really. But only, if you are running version 12.1 or lower. Otherwise, you can use names up to 128 characters. We found that out the hard way, while migrating MSSQL database to ORACLE platform. Anyway, you can find out what length your column and table names can be, by running following statment in your SQL client:

describe all_tab_columns


People, suggesting that copy & paste for VPN connections must be disabled, should be “taken care of”

The title says it all really. Disabling copy & paste option over VPN connection might have some security benefits and I am pretty sure that some auditor can’t sleep, if it is not, but it is annoying as hell for anybody that actually tries to use VPN connection for REAL work. Imagine you have to prepare a report for a customer that requires you to run a 300 line long SQL statement. Obviously, you are not developing that in their environment. You are doing it in your local database. Now, you just need to somehow get it to the customer system. Copy & paste seems harmless enough. Yeah, not going to happen. So now, you need a Dropbox (best case scenario) or, mailing that SQL to customer’s admin and hoping that person knows what he/she is doing. Not to mention the awkward situation, when you find out you forgot to add just one more column or condition to your SQL statement.

Kudos to all auditors, recommending ban of copy & paste. NOT.


No matter what the task is, you must take your time to solve it

Sounds reasonable enough. Right? Except, when you are bogged down with work, and now a trivial, but urgent task comes in, forcing you to drop everything and focus on that specific task. Hah, but the task is trivial. What could possibly go wrong? Well, for starters the fact that assumption is a mother of all clusterfucks (pardon my French). So, now, you solved the task half-arsed, passed it back to customer, only to let it hit you right back on your head 30 minutes later. Instead of doing it properly, the first time, you will have to do it the second and hopefully not the third time, taking even more of the time you didn’t have in the first place. Meanwhile, your reputation with your customer is sinking faster than RMS Titanic.

Even in times of stress and distraught, it is important to remember, that each and every task is worth your attention. If naught else, it will save you minutes, if not hours and leave your reputation intact.


CSRF feature, known as warning SG0016 is annoying, if you are implementing public API

“New” Visual Studio 2017 comes with abundance of new features. One of them is giving you security recommendations that behave as warnings. Roslyn Security Guard it is called. All fine and dandy. Sadly, though, most of those recommendations are useful only, if you are developing an internal applications. If you are building, let’s say, public Web API, you really don’t want to hear about that CSRF SG0016 warning telling you to validate anti-foregery token. Specially, as all requests are coming from other servers and you have no way to validate that token.

There is a workaround to add

#pragma warning disable SG0016

just below class declaration, which suppresses the warning until you do this

#pragma warning restore SG0016

I would have still preferred a project option to disable that, though.


How to use query string parameters in non-RESTful API

I had to connect to 3rd party non-restful API, that invented all sorts of parameter passing options. From classic JSON for POST requests to combination of route parameters and query string parameters. As I had no access to the API from my development environment, I created a mock API and had to mimic the original API’s behavior.

For route parameters, you simply define a route that knows how to handle them, like so:

config.Routes.MapHttpRoute(
    name: "DefaultApi",
    routeTemplate: "api/{controller}/{id}/{taxId}",
    defaults: new { id = RouteParameter.Optional, taxId = RouteParameter.Optional }
);

If you want to obtain parameter from query string though, you must define [FromUri] in front of it in method declaration:

[HttpGet]
public HttpResponseMessage QueryCustomers([FromUri]string taxId)


FastDirectoryEnumerator!

A quick task. You need to move 10.000 files from one folder to another.

Solution 1

Use Directory.GetFiles to get a list of all files in directory and then use File.Copy to move them to another location.

Problem with this solution, however, is that although it works fast, it will store all file names into a string array, thus hogging your memory resources like crazy.

Solution 2

Use Directory.EnumerateFiles to get a list of all files in directory and then use File.Copy to move them to another location.

Much better solution as it returns files as IEnumerable<string> which allows you to traverse files before all are loaded.


Now imagine that source or destination or both for files that need transfer are on network drive. In that case, first solution will take around 30 seconds to read all files. Second will not fare much better, getting all files read in about 25 seconds. And this on a fast network drive.

Introducing FastDirectoryEnumerator for next solution.

Solution 3

Using FastDirectoryEnumerator.EnumerateFiles, it read 10.000 files in about 20 miliseconds. Yes, that is right. Miliseconds.

You can check documentation and implementation on CodeProject site. The secret is, apparently in not doing a round-trip to the network for each and every file. That and using kernel32.dll.


When using integration to move some data, always use separate table

Another project of mine has a bug. Yet to be decided, if it is human or code, but in any case, code should prevent such situations.

This is what happens. The code moves some data from table ITEMS via 3rd party web service to their product. This is done by a column named STATUS in the table ITEMS, which must hold a certain value. The code sets status to “moved to 3rd party service”, prior completion and to “error” in case of execution errors. Upon completion a 3rd party code is written into another field (let’s call it EXT_ID).

Unfortunately, web interface for adding and editing items also uses STATUS field for document workflow. Meaning, it sets status on certain actions.

Lately, this started to happen. An item gets picked, status is set to “moved to 3rd party service” and transfer completes and sets EXT_ID. During this process someone with item opened in browser clicks on “Confirm” button again in web interface and sets status back to “pending for transfer”. Action also removes EXT_ID. As 3rd party service checks for duplicates, it returns a duplication error.

To avoid this, a way better solution would be to create a table ITEMS_TRANSFER. The row would be added to this table (with hash of values), when transfer would be requested and removed (or marked as removed) when transfer completes. This would certainly prevent duplication errors.

What I learned last week at work #3

In a 3 day week, I only managed to learn how to get distinct IP addresses from log file.

How to get distinct IP addresses from log file

For a customer of ours, I had to screen two years of log files and find distinct IP addresses for certain criteria. You could check those log files by hand. Sure, it would take a month or two, but it can be done. However, if you are not keen of spending your day looking at log files line by line, here is what you can do:

  1. You can grep log files for specified criteria:
    grep -iRn "<my criteria>" --include=*.log
  2. Then you can parse results to get all IP addresses:
    grep -o '[0-9]\{0,3\}\.[0-9]\{0,3\}\.[0-9]\{0,3\}\.[0-9]\{0,3\}'
  3. You can then use awk, to print them on separate lines:
    awk 'NR%2{printf $0"\n";next;}1'
  4. And again use awk, to print only distinct ones:
    awk -F: '{ if (!a[$1]++ ) print ;}'
  5. Optionally, you can store output to file:
    > _ip_addresses.log

Ideally, you want to run this in one command:

grep -iRn "<my criteria>" --include=*.log | grep -o '[0-9]\{0,3\}\.[0-9]\{0,3\}\.[0-9]\{0,3\}\.[0-9]\{0,3\}' | awk 'NR%2{printf $0"\n";next;}1' | awk -F: '{ if (!a[$1]++ ) print ;}' > _ip_addresses.log

There you have it! File _ip_addresses.log now contains only distinct IP addresses.

I am pretty sure, it can be done differently. You can leave your solution in comments below.

What I learned last week at work #2

It’s been a quiet week at work. Fixing a bug here and there, implementing minor features, writing some documentation etc etc. Hence, this weeks findings are not programming related.

Without further ado, here is what I learned last week:

  • Windows 10 app restart on unexpected shutdown (or after update restart) cannot be disabled;
  • Solving ‘PkgMgr.exe is deprecated’ error.

Now to details.


Windows 10 app restart on unexpected shutdown cannot be disabled

Since Fall Creators update Windows 10 gained an interesting feature. Much like OS X, it restores your applications upon unexpected shutdown or maintenance restarts. Now, I bet this feature sounds great on paper and I bet it is perfect for your everyday user. However, the feature is totally useless and annoying to anyone, doing something more with his/hers computer, besides browsing the internet and watching occasional X rated movie.

Imagine this. At the point of maintenance restart (updates have finished installing), I have 7 Visual Studios 2012 in administrator mode, 5 Visual Studios 2010 (again in administrator mode), 6 Microsoft SQL Management studios, a Notepad++, Outlook, 3 Word documents and 5 Excel worksheets open. I am not even going to count remote desktop sessions and other minor software windows. Now, computer does reboot, it comes back and and I am presented with login prompt. After typing my password 3 times (seriously, I need another password), OS starts loading all windows mentioned above. Except, it opens all Visual studios in normal mode and without opened solutions (thanks for that, btw). Same goes for MS SQL Management Studios. It opens 6 instances, not one having an active connection or at least a correct SQL instance selected. Useless and annoying.

To top it all off, apparently, this feature cannot be turned off and no upgrade to make this available is scheduled to this point.

Solving ‘PkgMgr.exe is deprecated’ error

After a server came crashing, we had to set up a new one. After completed install of server roles and features and our applications, I tried running some of them and got Service unavailable error. I tried to register .NET by issuing

aspnet_regiis -ir

command. This returned another error PkgMgr.exe is deprecated. Quick googling found this page, that explains the cause for the error is missing ASP.NET installation. I went back to server installation and selected ASP.NET 3.5. That solved the problem.

What I learned last week at work

I am a firm believer of a fact, that if you are not learning anything new at your work, it is time to move out of that comfort zone, pack your bags and find a gig where you will. Lately, my work shifted and consists of 99% maintenance grunt work and 1% of actual new development. In that kind of situation, a person can easily forget, that despite chewing the dog food, there is an occasional pickle here and there. So, I created this series. To remind myself, that I am still learning something new and to, hopefully, provide some extra value to whomever stumbles to this place.

So, these are the things I learned in past week:

  1. The verb INTO is not necessary when running INSERT SQL statements on Microsoft SQL Server;
  2. Direct cast of column value of System.Data.DataRow object in .NET 1.1 does not work anymore on Windows Server 2012 and Windows 10;
  3. How to compare strings with fault tolerance;

Now to details.


The verb INTO is not necessary when running INSERT SQL statements on Microsoft SQL Server

Debugging for some odd mishap, I have located the following piece of code:

insert SOME_TABLE (column1, column2, ... columnN) values (...);

According to SQL standard, verb insert should be followed by verb into. Except it wasn’t. I thought that this has got to be some obsolete code that no-one uses. I’ve checked references and found a few. So that wasn’t it. The code obviously worked, as it exists since 2012. So what the hell?! Well, it turns out, that even though the verb into is mandatory by standard, most implementations (Microsoft SQL server included) ignore this and keep it as optional. I am definitely not adopting this, but it certainly is interesting.


Direct cast of System.Data.DataRow column value in .NET 1.1 does not work anymore on Windows Server 2012 and Windows 10

Yes, I know. Microsoft stopped supporting .NET 1.1 framework with Windows 7. Still, we have some projects that run (or more accurately ran) properly even on newer Windows OS. Except that with every update to Windows 10 and Server 2012 it is more and more obvious that .NET 1.1 is getting pushed out.

The latest thing was an InvalidCastException when executing this statement:

int value = (int)row[0];

where row is of type System.Data.DataRow. One would think that value is not integer, but in this case it was 103, which by my books, is an integer. Interestingly enough, this works:

int value = Convert.ToInt32(row[0]);

Go figure.


How to compare strings with fault tolerance

In one of our projects, searching by peoples name and surname just wasn’t good enough. Spelling mistakes and different characters in place for unicode ones were supposed to be taken into account.

After 5 minutes of “googling”, I found a StackOverflow answer that suggested using Damerau-Levenshtein distance algorithm. Levenshtein’s distance algorithm provides a way to calculate number of edits that need to be done on one string to get another. Damerau-Levenshtein algorithm is an upgrade that also allows characters to be transposed.

However, this is just the first step. Algorithm provides you with a number of edits. To use it, you still need to define a threshold of how many mistakes will you allow. Fixed values are just not good, if your string length varies. So, I used half of the length of either search query or provided value. It works like a charm.

Quick tip: Optimizing repeating try-catch-finally statement

Lately, I’ve started noticing a pattern in data layer of one of our projects at work. The pattern looks like this:

SqlConnection connection = null;
SqlTransacton transaction = null;
try {
    connection = new SqlConnection(connectionString);
	connection.Open();
	transaction = connection.BeginTransaction("transactionName");
	// execute database queries and do mapping and stuff
}
catch (Exception) {
	if (null != transaction) {
		transaction.Rollback();
	}
	throw;
}
finally {
	if (null != connection) {
		connection.Close();
	}
}

This repeats itself in just about every data layer method. Lines and lines of useless, repeating code for which I am also to take a lot of blame. So I thought: “There must be a better way than this.”

And there is. I created this method in data layer base class:

public T ExecuteDbCommand<T>(string connectionString, Func<SqlConnection, SqlTransaction, T> action)
{
	SqlConnection connection = null;
	SqlTransaction transaction = null;
	try
	{
		connection = new SqlConnection(connectionString); 
		connection.Open(); 
		transaction = connection.BeginTransaction("transactionName");
		return action(connection, transaction);
	}
	catch (Exception)
	{
		if (null != transaction)
		{
			transaction.Rollback();
		}
		throw;
	}
	finally
	{
		if (null != connection)
		{
			connection.Close();
		}
	}
}

This enables me to now change every data layer method to look like this:

return ExecuteDbCommand<ReturnClass>((connection, transaction) =>
{
	var command = connection.CreateCommand();
	command.Transaction = transaction;
	// do database stuff and port result to ReturnClass
	// return ported result
	// commit transaction if needed (on update or insert statement)
});

This solution has a small issue though. If you are doing insert or update, you might not want to return anything. As you cannot return void, just define returning type to be object and return null. I am prepared to live with this.


Failed to load resources from file. Please check setup

Not so long ago an application written in .NET 1.1 started to pop this error up and about. Funniest thing though, only Windows 10 clients with Creators update installed were affected. Now, we could argue, why there is still an application written in .NET 1.1 and running, but that could be a lengthy debate in which I really don’t want to go into right now. Or ever.

Anyway. The error, as descriptive that it is, means only one thing: somewhere in your code, there is a StackOverflowException. In case you are wondering, no, event logger won’t detect a thing. After much trial and error, I have narrowed the problem down to this chunk of code:

public object GetValue(string someParam) {
    try {
        return GetValueEx(someParam).ToString();
    }
    catch (Exception ex) {
        return null;
    }
}

Method GetValueEx returns a response of type object. In this particular case, it should have been a string, but as there are no hits in the database, it returns null. So, basically, the line 3 of method GetValue should have thrown a NullReferenceException, which catch statement should have caught. Except it doesn’t.

I don’t have enough information to explain all details, but on Windows 10 Creators update line 3 throws StackOverflowException, which is for some odd reason not handled by try-catch block. And this causes “Failed to load resources from file. Please check setup” error.

Knowing this, I modified my code to:

public object GetValue(string someParam) {
    try {
        object result = GetValueEx(someParam);
        return (null == result) ? result : result.ToString();
    }
    catch (Exception ex) {
        return null;
    }
}

Needless to say, the fix works without a glitch. Being a good Samaritan, I have also posted the answer to this StackOverflow question.